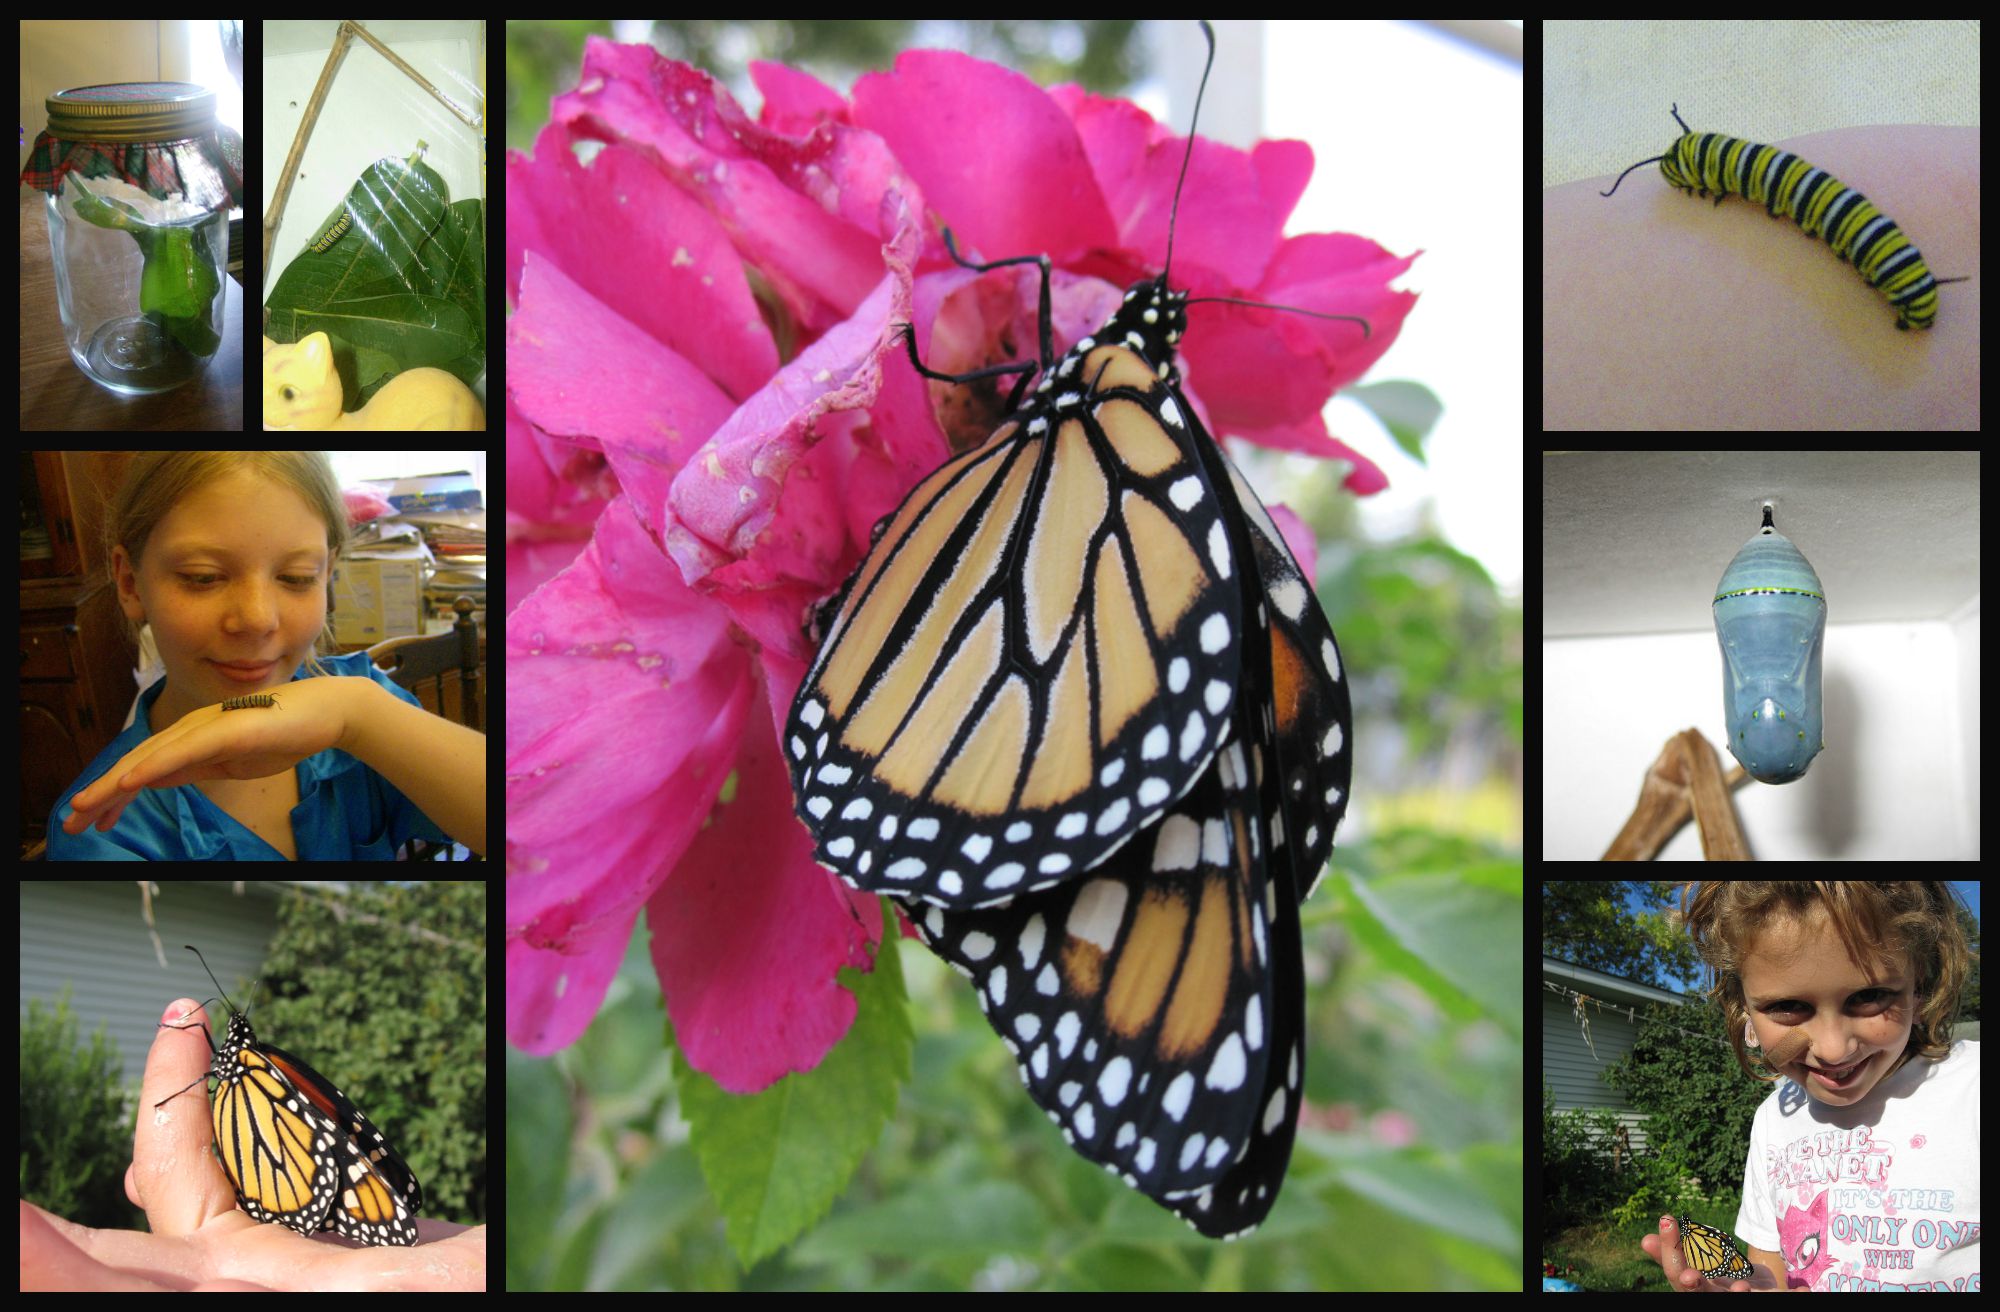
Raising monarch butterflies from caterpillar eggs has been one of the most magical ways that we’ve done nature studies in our homeschool for many summers.
Some families order butterfly kits through the mail, but we’ve filled our yard with lots of plants that butterflies need at various parts of their life cycles so that they’ll come to us and we’ll have everything they need to naturally grow as our temporary house guests.
The most important plant for this is milkweed. We scattered the fluffy seed pods a few times and that was all it took for plants to spring up in various parts of our yard. After that, the monarchs came to us every summer and the rest was easy.
Here are pictures of the process as we do it.

We brought in this milkweed leaf that had a tiny monarch caterpillar egg on the underside. The egg was as small as the period at the end of this sentence.
We put the leaf in a glass mason jar with a cloth on top of it. The cloth allows lots of air into the jar but the tiny weave of the cloth prevents the new (very tiny) caterpillar from being able to wander out of the jar. Be sure to use fairly tight weaves or you may lose your caterpillar!
We waited several days for anything to happen.

When he hatched, he was such a tiny caterpillar that we had trouble seeing him. We even thought we’d lost him for a day. They can be very, very small when they first hatch!
But he grew…

… and grew.
This process takes several weeks as the caterpillar completes this part of his life cycle. While he’s was growing, we made sure to provide a constant source of fresh milkweed leaves in the jar. They dried out after a few days so we’d rotate them as they seemed not as fresh. The milkweed provides everything they need to grow and be healthy.

We also cleaned the bottom of the habitat as needed. The old leaves and caterpillar waste can go right into the compost or garden to contribute back to nature.

Caterpillars will typically curl up like this when they feel threatened and think they may be eaten. If your caterpillar does this, remind the kids to be very gentle and still with him so he’ll feel comfortable and safe.

Even after curling up, this caterpillar quickly figured out that all was okay and set about exploring. This kind of up-close nature study can be great for kids, but then remind them to gently put caterpillars back in their habitat so they don’t get too stressed. That way they can busy themselves with the business of growing and preparing for their eventual transformation!

The caterpillar kept growing and getting bigger until he was so big and fat that we knew he would “J” soon (hang like a J and get ready to make his chrysalis). He was even climbing to the top of his jar to scout out a good location.
Then it was time to make a butterfly house.

We used a shoe box to make this butterfly house.
We poked air holes all around and taped saran wrap over the top, with the wrap left open (but folded over) at the bottom so we could change his leaves. We also gave him a stick to climb onto and dry on when he emerges from his chrysalis, since his wings will be wet and he will need to pump them and dry them for several hours before he can fly.
If he doesn’t have room to spread them out, they will dry deformed and he’ll never be able to fly. We are helicopter parents when our butterflies emerge for this reason.

He set off right away to explore his new home, checking out all the leaves and then going up to the top of the branch and down the other side.
Even when you think your caterpillar is as big as he’s going to get and so close to forming a chrysalis, you typically still need to wait longer before it finally happens.

One morning we came down and the chrysalis was formed.
We have tried to catch our caterpillars in action as they hung and formed their chrysalids over the years, but we have almost never caught the process. They do it remarkably fast once they are ready, and always seem to pick the perfect private moment.
First they will go to the top of the box and hang like a J, and stay that way for quite some time. Then they will rather quickly form the chrysalis. You have to be very patient and observant to catch that part! Some of our kids have been lucky enough to watch it happen.
Notice the color of the chrysalis at this point. This is a new one. Over the next couple of weeks, it will darken and change colors. You will be able to barely see the developing butterfly inside, right down to the pattern on the wings as they form. You’ll also notice the beautiful gold dots along the top of the chrysalis.

Then one morning, we came down to see that our butterfly had emerged.
We knew to let him hang and dry his new wings over the next few hours. At this point, the butterfly pumps the wings to fully extend them and help them dry straight. Don’t rush this time to release your butterfly outside and do not touch or bother your butterfly during this time period at all. You’ll observe how the butterfly will expand, pump and gently flutter his wings over the next couple of hours (typically in the morning).

Once your butterfly seems fully dried and is starting to flutter in the habitat and show signs of looking for an exit, take him to the backyard (still in the habitat). You or your child can then open the habitat and gently offer your finger next to his feet for him to climb onto.
DO NOT TOUCH THE BUTTERFLY’S WINGS. They are very fragile. Remember to be extremely careful with the butterfly.

The butterfly will climb onto your finger just as it would a branch, and will probably hang out there for a few minutes. Ours do not typically fly off right away. They have never flown before and their wings may not be fully ready. We have had a few take off right away, but most do not.

If your butterfly does not fly off right away, find a good spot to put him where he can finish drying his wings and readying for flight. He will probably stay there for a few more minutes and then may fly just a short distance to another perch. Then, before you know it, he’ll fly way up into the sky and flutter away.
With the milkweed leaves in your yard, it’s likely that you’ll keep seeing butterflies every year. Our kids like to wonder if any of “their” butterflies are returning and laying any of the new eggs that we raise the next year.
Enjoy the adventure!
***
Want to support our site?
Treat yourself to something on Amazon!
You deserve it, and it will help us out.
It’s a win-win! 😉
This site is an affiliate for Amazon.com. Purchases made through this link will earn us a small commission, at no extra charge to you.
***
This article originally appeared on examiner.com