Make A Puzzle Ring!
Here's an idea I got from a Montessori catalog and adapted to make into a fun and educational craft project.
Not only is it much more fun to make ourselves but free is much better than $60! You can use it to teach
shapes, colors, letters or animals, or you can let older kids have fun with the artistic side of it.
You'll need:
A cardboard box (a pizza box is perfect)
scissors and/or an exacto knife (for adults only)
markers, crayons, stamps or paint
a large circle to trace (pizza pan, clothes basket) and a smaller one
- Place your large circle on top of your box and have your child trace all around it with a pen. Cut out.
- Center the smaller circle on the larger one and have your child trace around that. Use the exacto knife or
scissors to carefully cut out the inner circle.
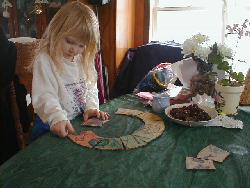
- Help your child make fairly large pictures, shapes and letters all around the circle. Stamps can make fun
pictures. You can trace a glass to make a circle, make letters for your child's name, whatever strikes your
fancy. Color the pictures with your child (the brighter and darker the better). We also colored the background
of the circle to make it stand out.
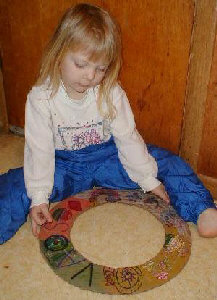
- Carefully cut right down the middle of each picture to make the pieces. Each piece should have half of one
picture and half of the adjacent one.
- Mix up the pieces and presto! You have a circle puzzle that is your child's own work of art!
For a variation to make it more difficult, color both sides of the ring before cutting it out. One side can be
shapes and the other pictures, one can be in blues and one in reds, etc.
To the Crafts Index
All works on this site Alicia Bayer unless otherwise noted.
Don't take it - that would be rude.